Set Up Batch Days
Schedule pre-order events so customers can order ahead and pick up on a specific day.
Pro plan feature (by request) — Contact support to enable this feature.
Schedule pre-order events so customers can order ahead and pick up on a specific day.
Overview
Batch Days let you plan baking days around your schedule. You pick a date, choose which products to offer, set when orders open and close, and share the link. Customers place their orders online before the pickup day, so you know exactly what to bake — no guessing, no waste.
Think of it like a farmers market booth, but customers pre-order everything before you even turn on the oven.
Steps
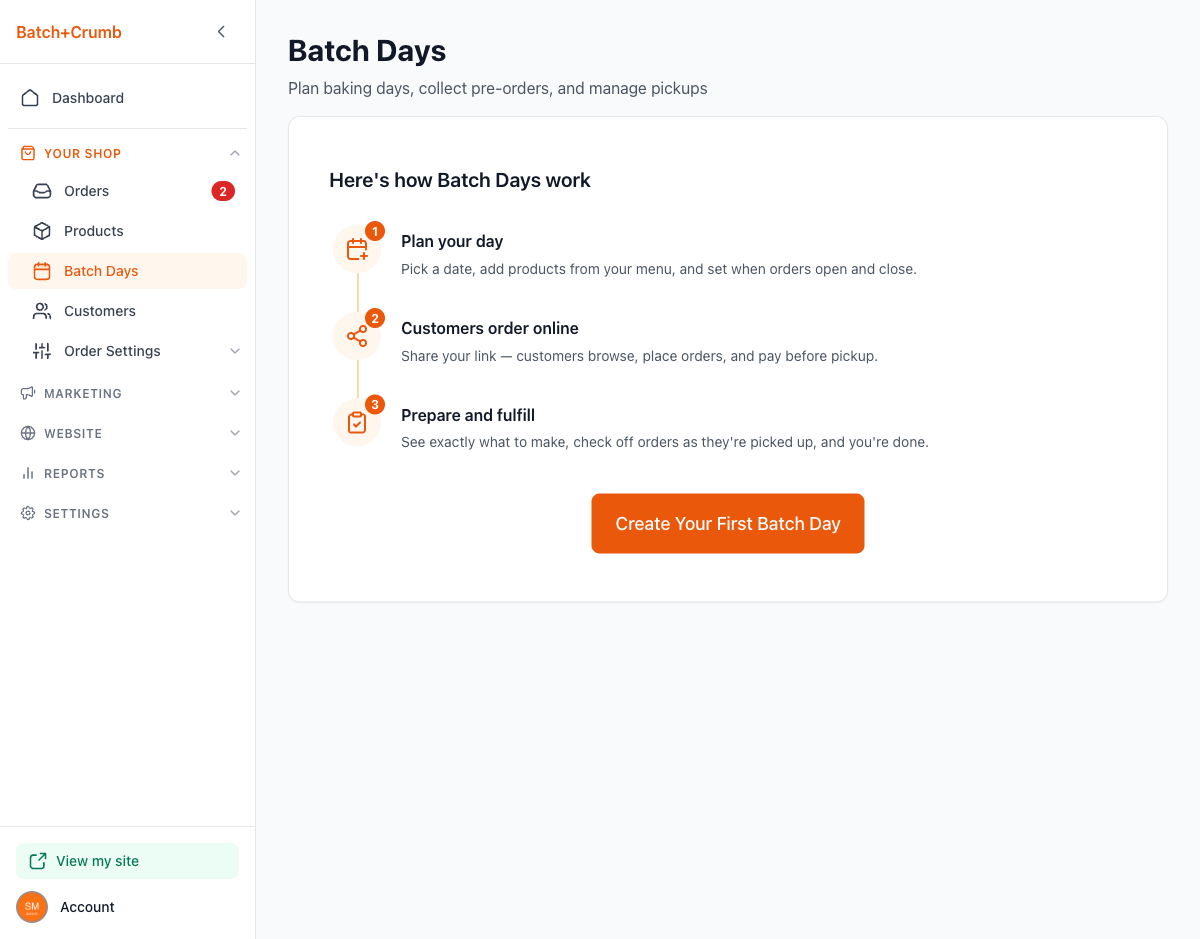
1. Go to Your Shop > Batch Days
Direct link: /site/admin/batch-days
From the left sidebar, click Batch Days under Your Shop. If you haven't created any batch days yet, you'll see an overview explaining how it works in three steps:
- Plan your day — Pick a date, add products, set when orders open and close.
- Customers order online — Share your link and customers browse, place orders, and pay.
- Prepare and fulfill — See exactly what to make, check off orders as they're picked up.
2. Create a new Batch Day
Click the Create Your First Batch Day button (or + New Batch Day if you already have existing batch days). A form will open with several sections to fill out.
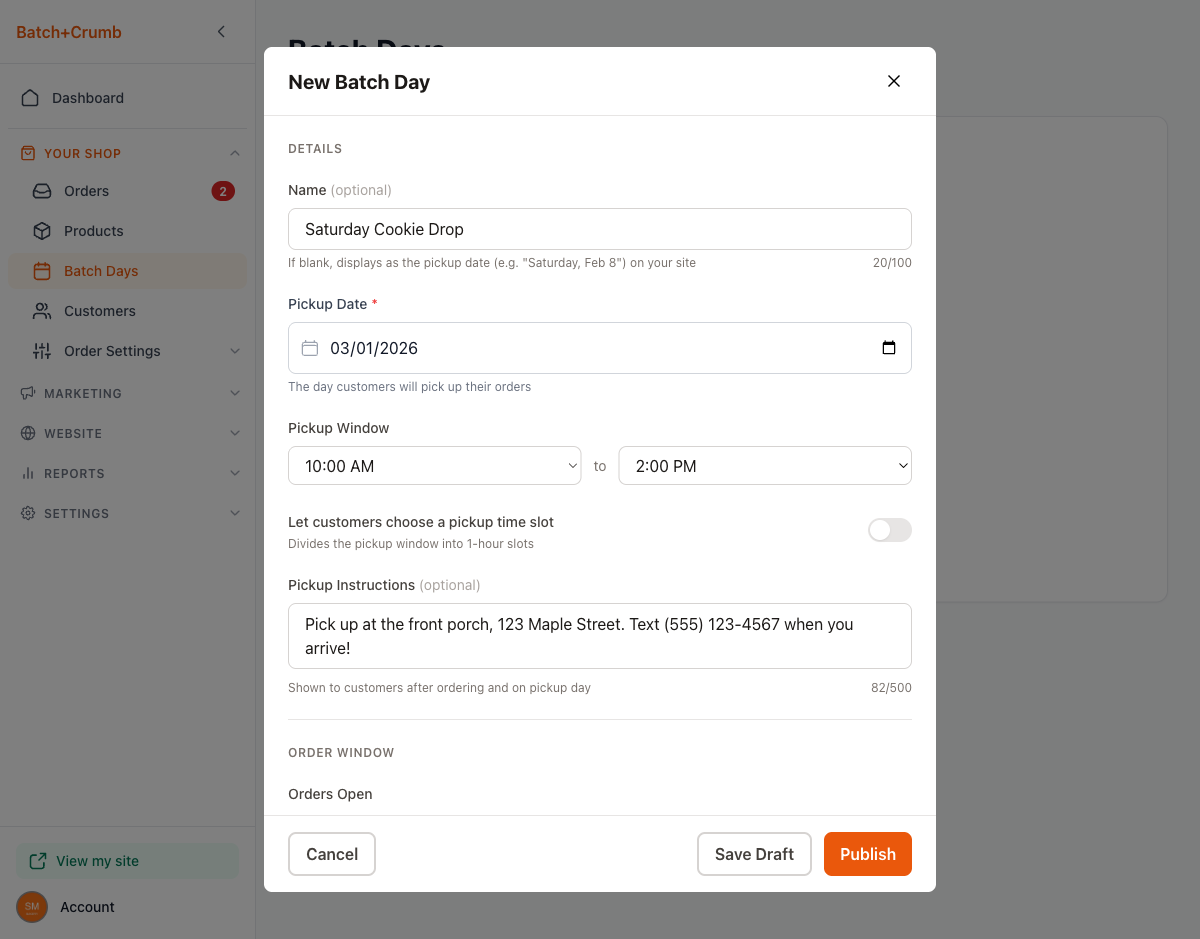
3. Fill in the details
- Name (optional) — Give your batch day a fun name like "Saturday Cookie Drop" or "Valentine's Day Treats." If you leave it blank, it will display as the pickup date (e.g., "Saturday, Feb 8") on your site.
- Pickup Date — The day customers will come pick up their orders.
- Pickup Window — Set a start and end time for pickups (e.g., 10:00 AM to 2:00 PM).
- Let customers choose a pickup time slot — Toggle this on to divide your pickup window into 1-hour slots so customers can pick a specific time.
- Pickup Instructions (optional) — Add directions for pickup day, like "Pick up at the front porch. Text when you arrive!" These are shown to customers after they order and on pickup day.
4. Set the order window
This controls when customers can place orders.
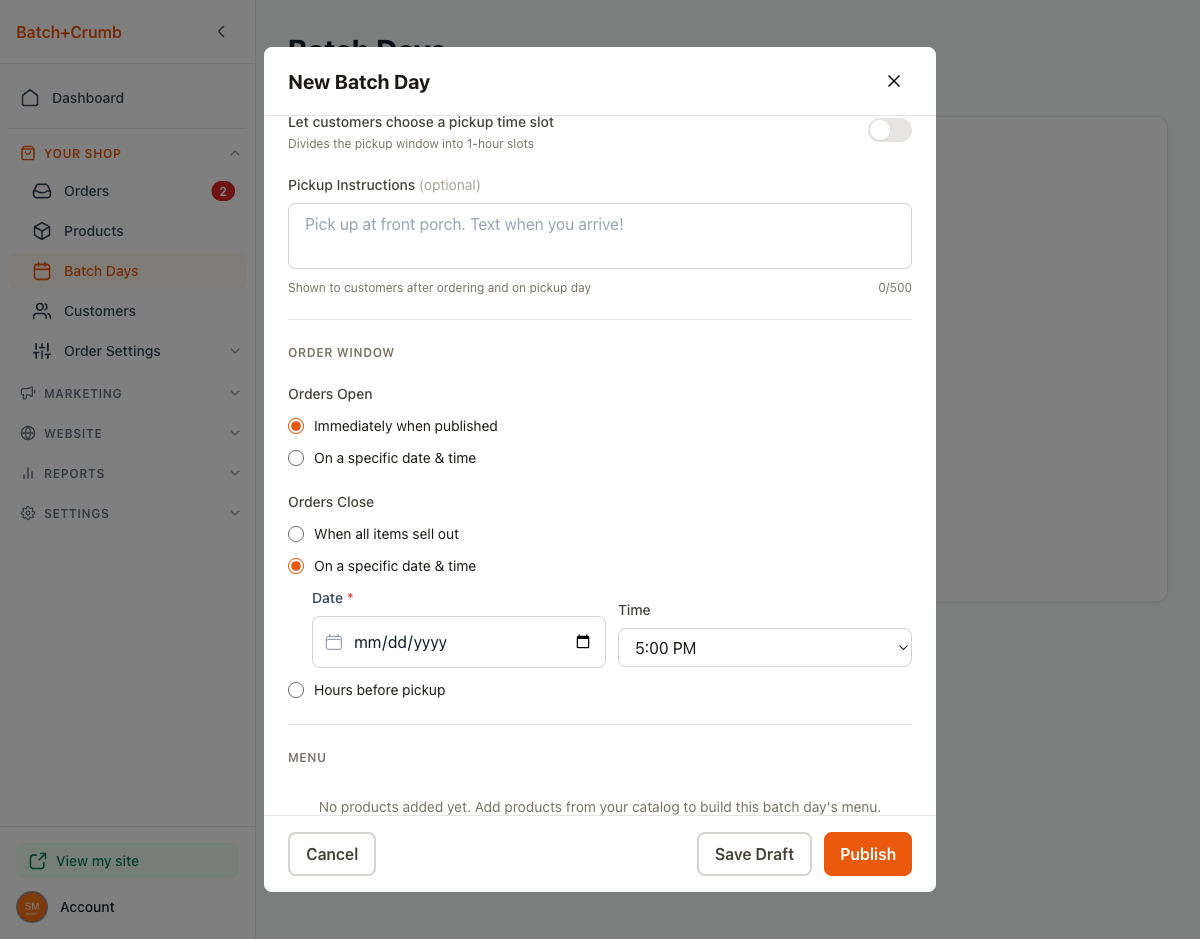
Orders Open — Choose when customers can start ordering:
- Immediately when published — Orders open as soon as you publish the batch day.
- On a specific date & time — Schedule orders to open at a future date and time.
Orders Close — Choose when to stop accepting orders:
- When all items sell out — Orders stay open until everything is gone.
- On a specific date & time — Set a cutoff date and time (e.g., the day before pickup at 5:00 PM).
- Hours before pickup — Automatically close orders a set number of hours before the pickup window starts.
5. Add products to the menu
Click + Add Products to choose which items to offer for this batch day. You'll see a list of all your products with checkboxes. Select the ones you want, then click Add Products.
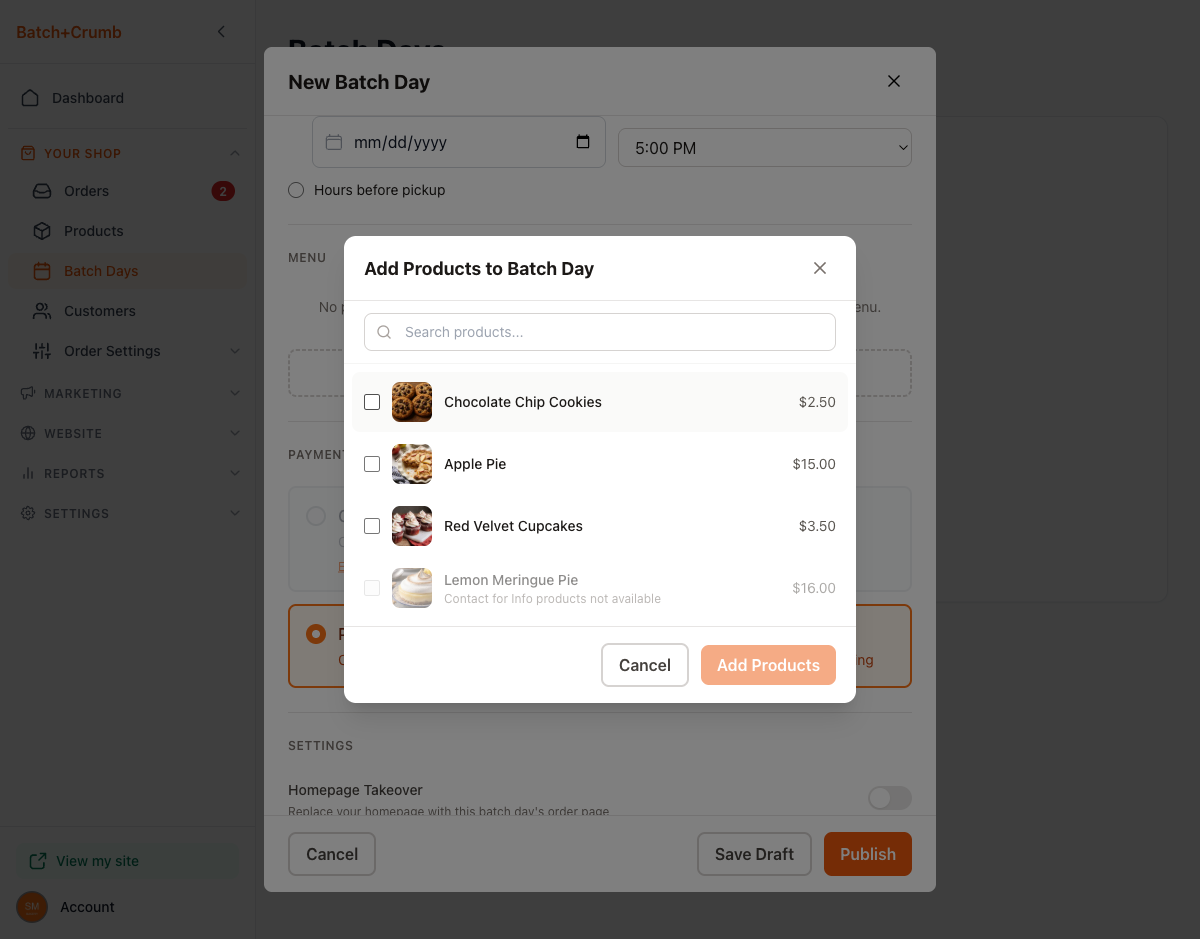
Once added, each product shows a Quantity Available field. You can:
- Leave it blank for unlimited quantity (shown as ∞).
- Enter a number to cap how many can be ordered. Once that number is reached, the item shows as sold out.
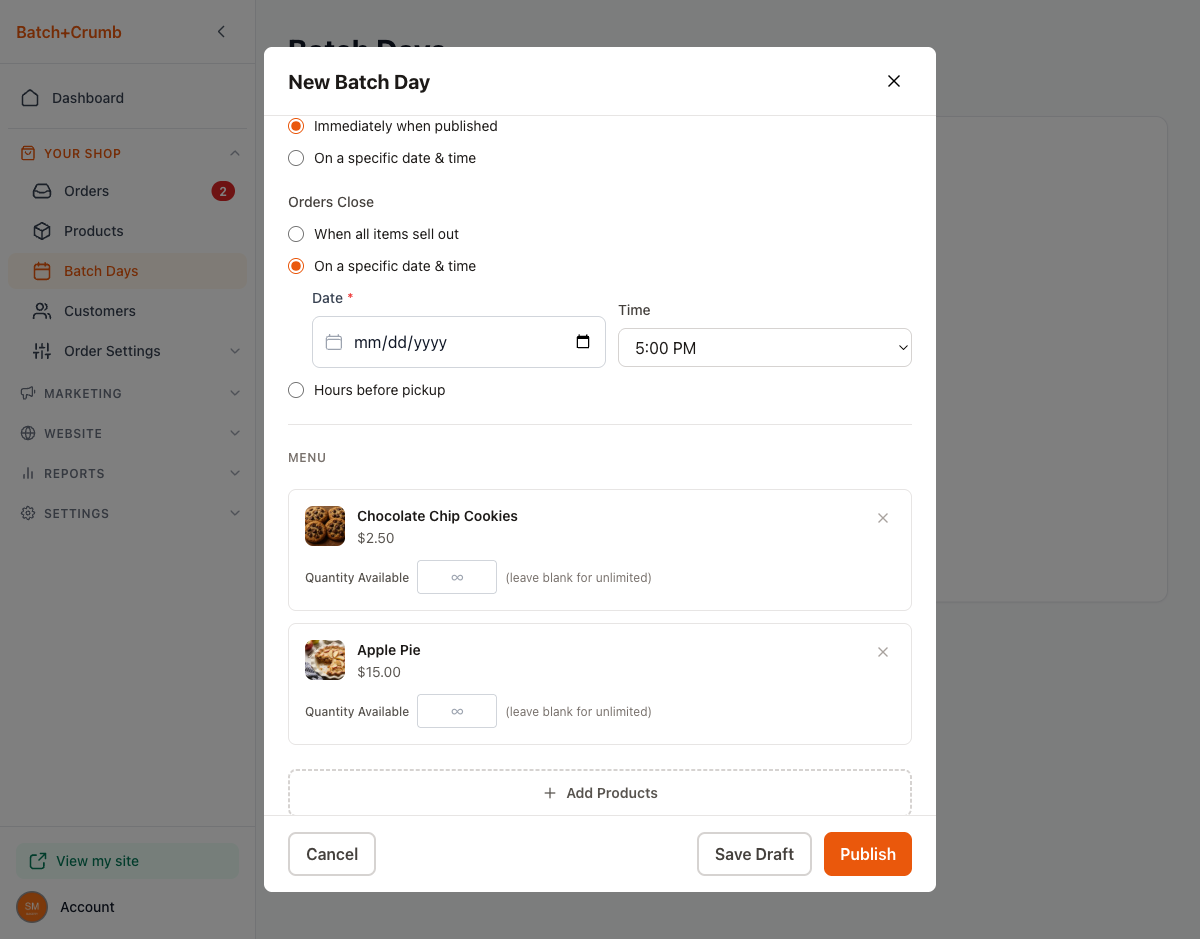
Note: Products set to "Contact for Info" cannot be added to a batch day — only products with the "Add to Bag" button type are available.
6. Choose a payment method
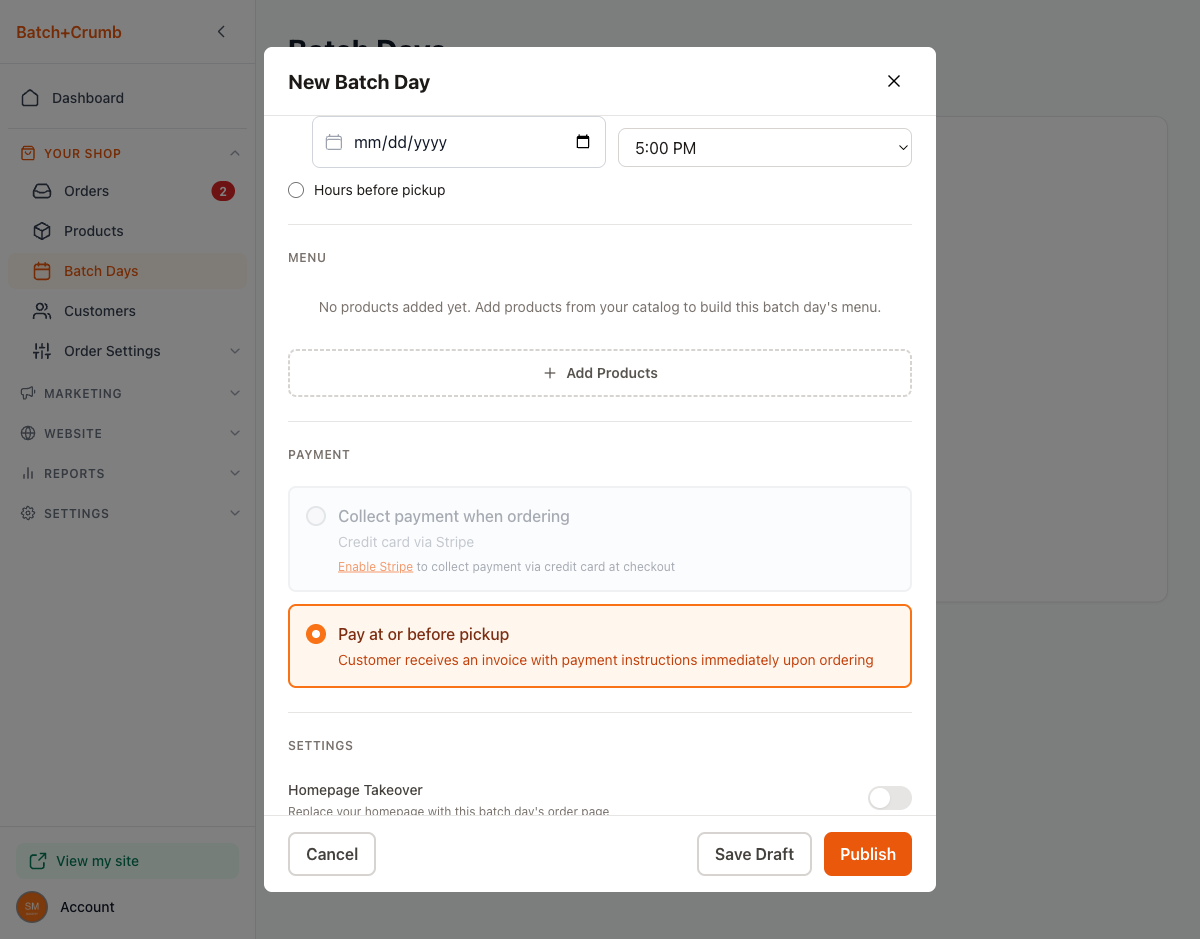
- Collect payment when ordering — Customers pay by credit card via Stripe at checkout. (You'll need to enable Stripe first.)
- Pay at or before pickup — Customers receive an invoice with your payment instructions right after they order. Great if you accept cash, Venmo, or other methods.
7. Configure settings
- Homepage Takeover — Toggle this on to replace your homepage with this batch day's order page. This is great when you want all traffic going straight to your upcoming batch day.
8. Save or publish
You have three options at the bottom of the form:
- Cancel — Discard your changes.
- Save Draft — Save the batch day without making it live. You can come back and publish it later.
- Publish — Make the batch day live immediately (or at the scheduled open time if you set one).
Managing Your Batch Days
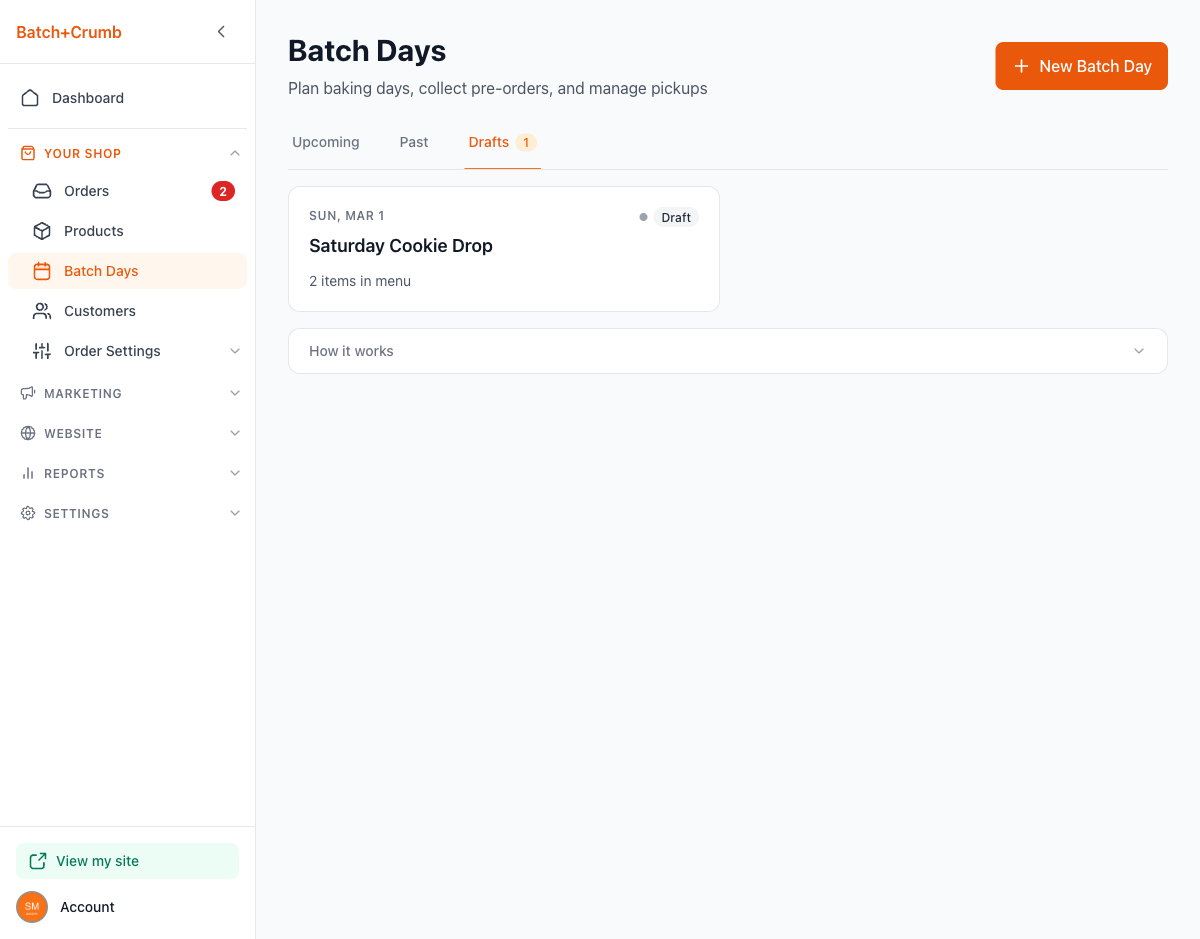
After creating batch days, the main page shows three tabs:
- Upcoming — Published batch days that haven't happened yet.
- Past — Completed batch days.
- Drafts — Saved batch days that haven't been published yet.
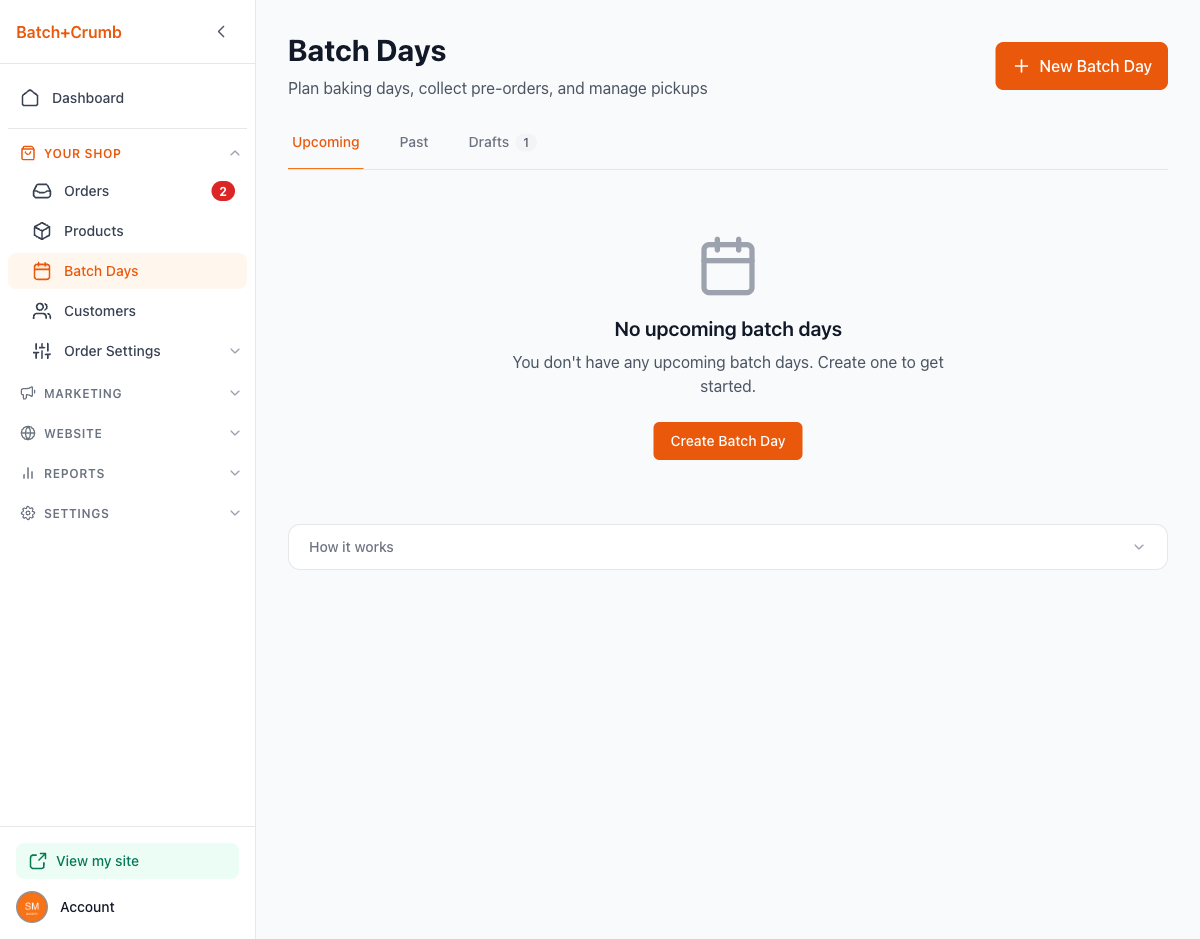
Each batch day card shows the date, name, status, and how many items are in the menu.
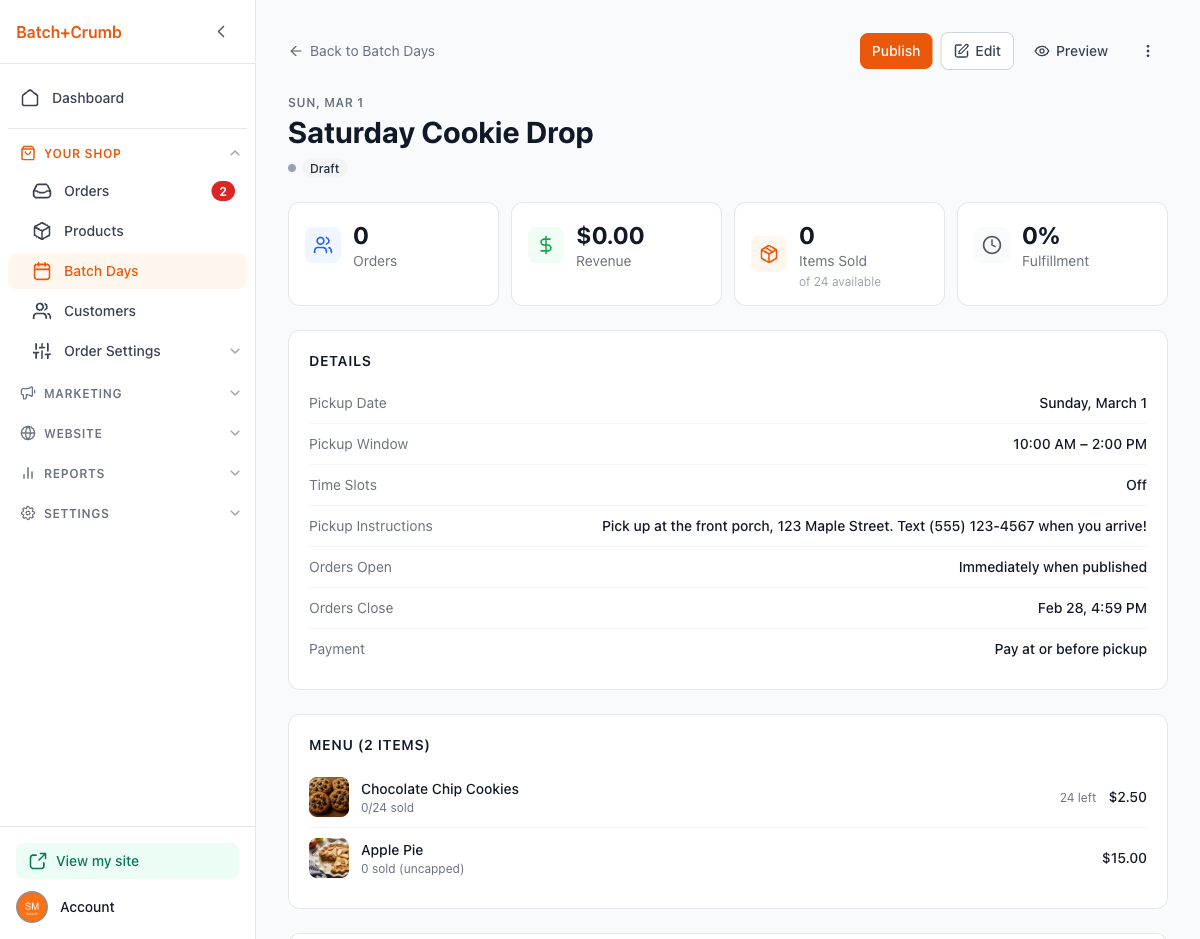
Viewing a Batch Day
Click on any batch day to see its detail page. Here you'll find:
- Stats at a glance — Orders, Revenue, Items Sold, and Fulfillment percentage.
- Details — A summary of all your settings (pickup date, window, instructions, order window, payment method).
- Menu — Your products with sold/available counts.
- Orders — A list of all orders placed for this batch day.
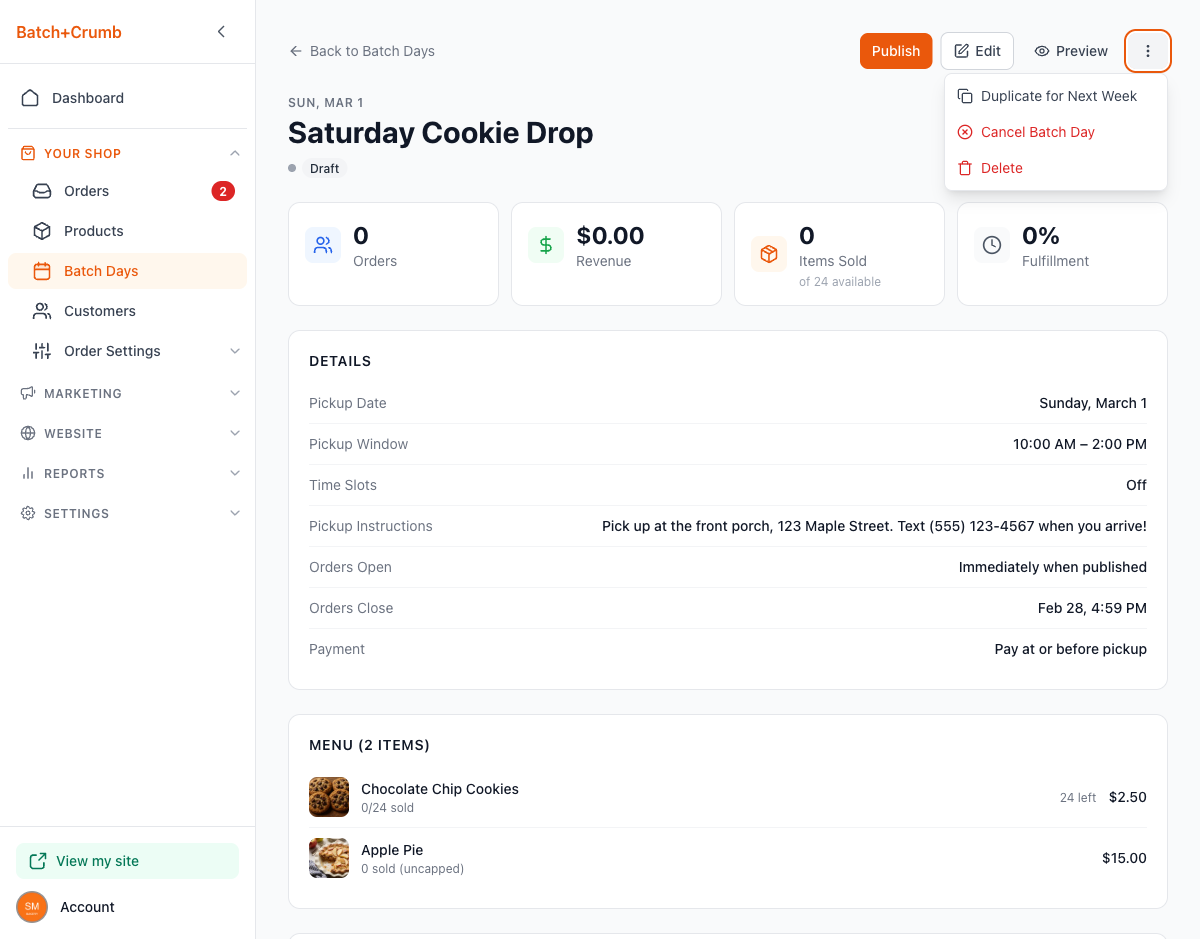
From the detail page, you can:
- Publish — Make a draft batch day live.
- Edit — Update the batch day details.
- Preview — See what customers will see.
- More options (⋮) — Access additional actions:
- Duplicate for Next Week — Quickly create a copy for the following week.
- Cancel Batch Day — Cancel a published batch day.
- Delete — Permanently remove the batch day.
Tips
- Start with a single batch day to get the hang of it before scheduling weekly events.
- Set limited quantities for popular items — it creates urgency and helps you plan your baking.
- Use the Duplicate for Next Week option to quickly set up recurring batch days without re-entering everything.
- Turn on Homepage Takeover when you have a big batch day coming up so visitors land right on the order page.
- Close orders at least a day before pickup so you have time to bake and prepare.
- Add Pickup Instructions so customers know exactly where to go — it saves you a lot of texts and calls on pickup day.